Tuesday, December 28, 2010

Hold onto your seats....

just a little tease...read more for the full reveal...
For Another chair(s) makeover.


I had theese done when I had my Happy Chair was redone...I call these my Princess Happy Chairs.  

I found not one but TWO of these jewels at an auction a few months ago for $25 apiece....I bought them to sell, and then.... as so often happens, I fell in love and had to keep them for myself.   There is somewhat of a princess feeling when I sit in them....and it gave much needed height to my living room.

These chairs in their former life....ho, hum, yawn....so sad. 


I had 2 yards of fabric that I  had been keeping for a while for just the right thing...I thought to myself...this might be it.   I wanted the chairs from the front to feel demure and soft, and fitting for my living room decor...but from the backside I wanted a bit of WOW!  And boy did I get it!  This is what you see when you walk into my house....

This updated damask has all of my colors in it, and sets the tone for the rest of the house....traditional with a twist...I have always wanted to use contrasting fabrics on my chairs...and this couldn't be more appropriate. 
Also, if I get tired of it it won't be a problem to replace....always thinking ahead!
 and this is what you see when you sit in the living room.

notice that I had them delete the tufting...
just because a chair is tufted before doesn't mean it has to be tufted after!

Oh, and did I mention that the front fabric is DROPCLOTH!!!!  Washed and bleached a few times to give it a softer hand. Trimmed with a chartreuse linen that I have had for a while. Since I didn't spend an arm and a leg on fabric, I won't feel as bad if something gets dropped on it......it is dropcloth after all RIGHT????? (at least that is the thought anyway!)  I am a huge fan of using drop cloths...notice the curtains...those are drop cloths too!  People almost fall OFF of their chairs when I tell them....I should just let them think I used linen...but this girl can't keep a secret...especially when it has to do with decor that doesn't have to cost an arm and a leg.


Just in case you are disappointed that these chairs aren't for sale...No worries there will be more chairs for sale when The Collected Home gets in full swing the beginning of the New Year!  Great things to come....

I won't be posting until the New Year....so I guess I will See ya next year!

Linking up to a drop cloth party over at Cottage and Vine. Where you can see a ton more drop cloth love. 

Friday, December 24, 2010

The Night Before Christmas...

Our Tree...it is hard to get a good picture when the lights are blinking:)
The tree is in the best spot in the house, you can see it from the living room, dining room, and den. 
Makes me Happy Happy! 

We hang the stockings right before the kids go to bed...


Twas the night before Christmas, when all through the house
Not a creature was stirring, not even a mouse.
The stockings were hung by the chimney with care,
In hopes that St Nicholas soon would be there.


Let's hope that is our house this evening....Santa and his elves have quite a bit still to do:)

Merry Christmas Eve Everyone:)

Wednesday, December 22, 2010

A baker I am NOT!

My Peppermint Concoctions...and a little card I designed.

 I have a secret....I am NOT a baker.  I have tried, and really wish I was, but I burn the easiest cookies.  It is actually a blessing during the rest of the year because  this girl loves to EAT bake goods!  Anyway, this time of year makes me uber stressed, b/c I think I SHOULD bake, but it always turns into a disaster....disappointment, and a mad dash to the store!  You see I am not a rule follower, and for those that know how to bake, know it is a science and you MUST follow the rules.  Oh, and baking takes planning, and I am not really good at that either!

Sooooooo, instead of my dreams of baked goods filling up my kitchen during the holidays. I resort to the old standby of peppermint bark.  I twisted the recipe up a bit and made some fun peppermint treats for neighbors, friends, and family.  (as you could see from my last post, I had an abundance of peppermints, candycanes, etc.)  So this is what I did this afternoon, for an Christmas Neighborhood Playdate....  Nothing like a little bit of last minute!

Easy Peasy Peppermint Bark.
A package (or 2 or 3 or 5) of White Chocolate Melted
crushed Peppermint
Spread on a sheet pan, pop in the freezer.

Variations on the Ol' Standby

Dip these in a bit of white chocolate...or dark, or green, blue would have been pretty too!
Dip the melt in your mouth mints in green chocolate....
what to do with left over green chocolate....DRIZZLE of course!

Cellophane bags
twine

Voila!

Merry Christmas to All!

Tuesday, December 21, 2010

A Hard Candy Christmas

nothing like a candy bar by the front door:)


Sorry for the lack of posting this week...I am "IN" the holidays and enjoying my family and friends....and all of the Holiday music that comes with it.  Hard Candy Christmas is one of my favorite songs...I love a good Dolly Parton tune.  So when we had our Christmas Party on Saturday (did I mention that??) We (my husband and I and my Best Friend and her sister) had a big Oyster Roast/Cocktail Party!  It was a ton of fun.  One of the things that we did for the shindig was to have a Candy Bar at the front door.  When everyone departed they could fill little celophane bags (or their pockets) with candy canes and chocolate.  I have enjoyed having it at the front door for the past few days...it came in handy when the carolers stopped by to "wish us a Merry Christmas" and for the neighbors that have dropped in.  I have now proclaimed that this is now a tradition (I tend to do lots of tradition proclamations around this time of year:)...maybe if I SEE all of the candy and chocolate in plain site it will keep me from eating it (it is a theory anyway:)

(As I write this, my daughter is saying she wants something "christmassy" for breakfast ie. candy... that it is the only thing that "gets her in the spirit".)  Does yogurt with candy on top count as a good breakfast???...

Tis the season:)

My posting is going to be spotty over the next week, I am just enjoying my family (school vacation is awesome, we slept in the past 2 days!)


PS...I am joining in a linky party today for Christmas Decor over at Cottage and Vine...there is lots of Great Christmas Eye Candy over there:)

Cottage and Vine

Merry Christmas Everyone:)

Thursday, December 16, 2010

Just something cool.

via SFgirlbybay via Bri Emery.  Just so simple clean and gorgeous!
 As many of you know, I am a graphic designer by trade....I don't really write alot about the graphics side of things, probably because I have been doing it for so long.  But I love it when graphics AND interiors meld so wonderfully together.   

This morning, I was looking at the Rue Magazine Party that they had at the Lavish event in Atlanta this weekend, and came across their super talented graphic designer Bri Emery's site.  One thing led to anther and I ended up on San Fransico Girl by Bay where Bri does a Design Love Fest SPACES series on Mondays.  I started scrolling through and loved the how the graphics and interiors in the spaces that she has highlighted go together.  AND then I came across the picture above and thought...."concrete letters" what a great idea.  I have been wanting to find letters to add around the house but haven't been able to find unique vintagey letters that I really like. 

So a little google search led me to this site The Sign Factory  where you can buy the molds in many fonts and sizes. BRILLIANT.  They have every other kind of letter too, from the aluminum to wood.    (too bad it is so close to Christmas, it would have made killer, and unique presents. Maybe next year.

So if you are feeling crafty this would be an awesome thing to do.  It has just gone on my list (towards the top of course...)

Happy Thursday.

Monday, December 13, 2010

Fabric Covered Ball Ornaments

My version of the fabric coverd ornament. (actually it is Martha's, but with my twist)

 One day last week, a friend of mine mentioned she saw "that guy" that you went shopping with in Charlotte on HGTV, decorating Kathy Lee Gifford's home for the holidays.   "that Guy" just might be "THE EDDIE ROSS!" I said!"  Anyway, she started talking about the Fabric covered balls that he did with Plaid shirts.


I have created these ornaments before, and now that my color scheme has changed in the new house, they were due for an update.  (the rusty red, and gold weren't going to cut it!)  My version is slightly different.  But has a similar effect.  Mine might be a little bit more taylored, but I love the way his turned out as well.  It actually would be nice to mix the two techniques.  I had learned mine years ago, from this tutorial by Martha Stewart how to create them.

So, I decided to update my ornaments.  My friend brought her kids over, and while all the kids created salt dough ornaments, out of dough that wasn't made correctly...woops:) (for another post) we created our fabric covered ornaments.  (muli-tasking at its best!)  AND everyone was happy!

The Materials for this project are simple.

2 or 3 inch styrofoam balls.  (I actually had a few of the 3 inch lying around)

Straight Pins.
6 strips of fabric cut on the bias, using this template.  I like to use dupioni silk and cotton.

Ribbon for trim and decoration.

The directions are simple.

1) Stretch your first piece of fabric from the top to the bottom (since it is cut on the bias it lays flat) Securing with your push pins. Continue around the ball until fully covered.

2) Then cut 6 pieces of ribbon and/or trim to cover the raw edges.

3) the top and bottom will be covered with pins, so it is nice to cover it up with some sort of embellishment.  I created a small bow with a vintage button attached and then looped a piece of ribbon around it to hang.  Martha has all sorts of other ideas from pretty pins to tassels.  OR if you just plan to put stack them in a decorative dish, just try to hide the imperfections:)


There you have it, really pretty ornaments.  I had fun updating my old ones and my friend used the Eddie version with scraps of fabric she had of clothes she had sewed for her 3 girls (very talented girl!)

We were joking that not only does she feel a little closer to Eddie, she feels a little closer to Martha, thru Eddie, thru me...Oh and to Kathy Lee.  You know 6 degrees of seperation:)

(and if my tutorial wasn't clear enough, I am sure that Martha's will be:)

Happy Monday!

Thursday, December 9, 2010

I love a good soup.

my soup display at Thanksgiving.
 It has been unusually cold here lately.  I mean, we southerners aren't used to it.  I am really not complaining, because I am  happy to wear my scarves and gloves that rarely get used.  When we have cold weather like this I love a good soup.  I came across a recipe when I was planning for Thanksgiving, and actually used it.  (We had an Oyster Roast and Soup Midday instead of the normal appetizers, and it really turned out well)

Anyway, I wanted to share the recipe because it is just the perfect hearty soup for these blustery busy days.

It was delish with a little bit of Champagne.


Elwood's Ham Chowder
(taken from the Nov. 2002 Martha Stewart Magazine)
5 quarts

1 tablespoon vegetable oil
1 pound Virginia ham, cut into ˙-inch
pieces
2 large onions, cut into 1-inch pieces
(about 3 cups)
4 garlic cloves, thinly sliced
2 bunches collard greens (about 1 pound),
stems discarded, washed, and roughly
chopped
1 28-ounce can whole tomatoes with juice,
roughly chopped
7 cups homemade or low-sodium
canned chicken stock
2 cups homemade or low-sodium canned
beef stock
8 medium red potatoes, cut into ˙-inch
cubes (about 6 cups)
1 1/2 tablespoons chopped fresh thyme leaves
1 1/2 tablespoons chopped fresh flat-leaf
parsley
Coarse salt and freshly ground pepper
Hot pepper sauce, such as Tabasco
(optional)
Mise en place


1. Heat the oil in a large stockpot over medium-low
heat. Add the ham, and cook until it starts to release
juices, about 2 minutes; do not brown. Add the
onions and garlic; cook, stirring occasionally, until
soft, about 10 minutes.

2. Working in batches, if necessary, so as not to
overcrowd the pot, cook the collard greens, tossing
frequently with tongs, until thoroughly wilted. Add
the tomatoes and juice, chicken and beef stocks,
potatoes, thyme, and parsley. Bring to a boil, and
reduce heat to a gentle simmer; cook, stirring and
skimming any foam from the surface occasionally,
until the potatoes are easily pierced with a paring
knife, 30 to 40 minutes. Remove from heat; season
with salt, black pepper, and hot pepper sauce, as desired.
Serve hot. 
 
It is REALLY good with the tabasco!  

Monday, December 6, 2010

Been working up the courage....


To tell everyone a couple of things.....Things I have been keeping secret...nothing huge or anything....maybe not "secret" perse, just that I was feeling a bit shy about putting myself out there...(as if this blog isn't putting myself  "out there"  HA!)

First of all, I started an etsy shop a few weeks ago.  There are only 4 things in there right now.  Over the weekend I made my first sale.  It was really exciting to get that email popping into my email box...Etsy transaction!  I thought that was a sign to let everyone know that


The Collected Home is open for business


I though the name fitting.  As you all well know, I am all about the "collected look", mixing old with new, vintage and antiques, bringing pieces that were otherwise discarded back to life with new fabric and paint...making a space feel like a home.

Sooooo stay tuned for more additions to the shop....I will add a link to my sidebar soon.  Some great lighting, and furniture (that may or may not be recovered or painted.  Maybe even a few of my custom designs (pillows, embroidery designs, fabric designs, etc.) Who knows....

Which leads me to another confession...my quest to HELP others CREATE a Collected Home....a home that tells a story about its owners, a home with a soul, a home that makes you happy to BE in your space. Giving CLIENTS the courage to paint a room, move furniture, recover a family heirloom, maybe even throw something away that isn't bringing joy to the space.  EVERYONE deserves to have a Happy space regardless of budget or other constraints.  And I intend to help make that happen...because it makes me HAPPY to do so!

I am officially hanging out my shingle.


This is the ad I just placed in my local Home Tour Booklet....I am on the committee and in charge of the tour booklet... I place a graphic design ad in every year....but this year, I changed it up a bit.  To my surprise, I got a bit of good feedback. 
And maybe even a few potential clients:)
So there you have it....deep breath, sigh, smile:)  And a big thank you for all of the support I get here, it has really given me the courage to just go for it....we will see.

Happy Monday!

Friday, December 3, 2010

A Wreath Tutorial

looks real doesn't it...????

Yesterday I set out to finish my wreaths...I finished my front door with REAL boxwoods....and then moved onto the window wreaths.

After the first one, it was becoming incredibly apparent that I was a) not going to have enough boxwoods b) that it was going to take forever c) that they were probably going to die before Christsmas...sooooooo, I went back to the drawing board.  I really absolutely, do not care for the Faux wreaths on the front of the house, it just isn't my style...what to do? What to do?  Well, I hit the internet of course and came across an idea....from the Suzie Harris Blog.    They seemed real looking without feeling "faux". And off to Hobby Lobby I went...

Her tutorial  became the basis for my wreath, with a little tweaking.  I pulled all of the stems off, and put more around the sides of the wreath....just depends on the look you are going for.

Materials:
14" Grapevine Wreath (3.99)
1 1/2 Faux Boxwood branches (7.99 (3.99 each 50% off )
Total for project: @$8.00 ($40 for 5 wreaths)
(Way less expensive than the other faux wreaths, and WAY better looking!)


Next

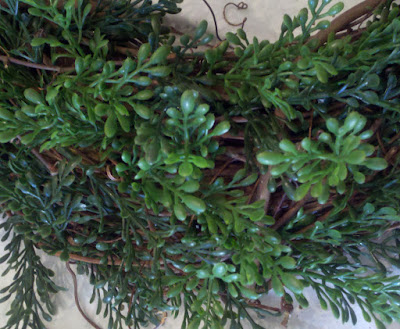
Pop the individual branches off of the main stem.


Then start stuffing them into the grapevine wreath.


Work your way around the wreath
(I added it to the sides as well to fill it out)


VOILA!
a VERY "real" looking wreath that I can use year after year. 
And it only cost @ 9.00 for each wreath! WOOT!
Off to finish the other 4...and my dear Husband will be hanging them outside this weekend...I will be sure to show you all the finished product!

Happy Friday..with lots of holiday decorating in my future!

Thursday, December 2, 2010

Wreaths on the brain.

via Eddie Ross...he moved yesterday so I thought it was a good starting point.

 So yesterday, my post got deleted by my husband...he didn't mean to, but still!!!!!...it was my "It's Official" post because it was December 1...well now it is December 2 and I guess it is just one day more "official" than it was before.   So I am going to try to recreate what I had written...

via southern living

via Cottage and Vine

I am the kind of person that really can't get into Christmas until the Calendar turns to December....well now I am IN it....knee deep in boxwood cuttings for my wreaths and ribbon...I went on shopping spree at Hobby Lobby everything was 50% off!  If I don't use the ribbon this year...weeeelll there is always next year, right?  You see, this year I am going to put wreaths on my windows, something I have always wanted to do.  I think I will put most on the outside front, but there is a part of me that wants them inside too.

via country living
via country living (isn't that pinecone topiary nice...)

via country living (I like the idea of a wreath NOT on a window)
via coastal living (Do you decorate your bedroom?)

via Sunshine and Wine (just so pretty)
source unknown  (I could eat here)

Since this is our first Christmas in this home, it is really exciting to see what it will look like all prettied up for the holidays....I have ideas... BIG ideas....HUGE ideas....now if I could just get my fingers to work faster....

which brings me to this question...Do you prefer Artificial vs. Real for exterior wreaths??? There is a part of me that is thinking I will just make my front door wreath out of real cuttings,(which is the tradition in our family) and then buy the others.  Why do I always feel I must make everything with my own hands????  Or maybe I will buy artificial cuttings and make my own artificial wreaths...that might be the ticket.


Now if we could only agree on where to put the tree.......hmmmm for another post I suppose.

Happy 2nd day of December!